Applies to: Windows Server 2022, Windows 10, Windows 8.1, Windows 8, Windows Server 2019, Windows Server 2016, Windows Server 2012 R2, Windows Server 2008 R2
Remote Desktop Protocol (RDP) is a widely used protocol that allows users to remotely access Windows machines over a network. By default, RDP uses TCP port 3389 to listen for incoming connections. However, sometimes it might be necessary to change the default port number to improve security and avoid potential attacks from hackers. In this blog post, we will discuss how to change the default port number for RDP.
Step 1: Modify the Registry
The first step to changing the default port number for RDP is to modify the registry. Follow the steps below:
- Press Windows + R on your keyboard to open the Run dialog box
- Type regedit in the Run dialog box and click OK. This will open the Registry Editor
- Navigate to the following key: HKEY_LOCAL_MACHINE\System\CurrentControlSet\Control\Terminal Server\WinStations\RDP-Tcp

4. Find the PortNumber entry and double-click it to open the Edit DWORD (32-bit) Value dialog box.
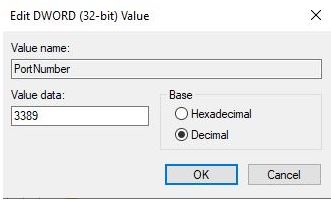
5. Choose Decimal, and then enter the new port number that you want to use for RDP. For example, if you want to use port number 3390, enter 3390.
Click OK to save the changes.
You can use PowerShell to check your current RDP port:
Code:
Get-ItemProperty -Path 'HKLM:\SYSTEM\CurrentControlSet\Control\Terminal Server\WinStations\RDP-Tcp' -name "PortNumber"You can also use PowerShell to change the port value and add the associated firewall rules with this command:
$portvalue = 3390

Set-ItemProperty -Path 'HKLM:\SYSTEM\CurrentControlSet\Control\Terminal Server\WinStations\RDP-Tcp' -name "PortNumber" -Value $portvalue

New-NetFirewallRule -DisplayName 'RDPPORTLatest-TCP-In' -Profile 'Public' -Direction Inbound -Action Allow -Protocol TCP -LocalPort $portvalue

New-NetFirewallRule -DisplayName 'RDPPORTLatest-UDP-In' -Profile 'Public' -Direction Inbound -Action Allow -Protocol UDP -LocalPort $portvalue
In the above example, the first command assigns a port number of 3390 to a variable named portvalue.
The next command, Set-ItemProperty, is the command that changes the default listening port for RDP on that machine.
And finally, the last two commands create the firewall rules to allow the RDP traffic on port 3390
Step 2: Configure Firewall Rules
After modifying the registry, you need to configure the firewall to allow incoming connections on the new port number. Follow the steps below:
- Press Windows + S on your keyboard to open the search box.
- Type Firewall and click on the Windows Defender Firewall option.
- Click on the Advanced settings option on the left side of the window.
- Click on Inbound Rules on the left side of the window.
- Click on New Rule on the right side of the window.
- Choose Port and click Next.
- Choose TCP and enter the new port number that you set in Step 1.
- Click Next and choose Allow the connection.
- Click Next and choose when the rule applies (Domain, Private, Public).
- Name the rule and click Finish.
Step 3: Test the Connection
After completing the first two steps, it’s important to test the connection to ensure that everything is working properly. Follow the steps below:
- Open Remote Desktop Connection.
- Type the IP address or hostname of the remote machine followed by a colon and the new port number. For example, if the IP address of the remote machine is 192.168.1.10 and the new port number is 3390, type 192.168.1.10:3390.
- Click Connect and enter the username and password for the remote machine.
- If everything is working properly, you should be able to connect to the remote machine.
Conclusion
Changing the default port number for RDP is a simple process that can be useful in a variety of scenarios, but keep in mind, RDP should NOT be public facing, or exposed to the Internet. If users outside the network need to gain access to resources within the network, whether it be via RDP or something else, they should connect to the network with a VPN or some other means, like RD Gateway.
By following the steps outlined in this blog post, you can easily modify the registry, configure firewall rules, and test the connection to ensure that everything is working properly. Remember to always take the necessary precautions to ensure the security of your remote connection.