To manage Microsoft 365 resources with PowerShell, modules are needed to provide an interface to access and manage those resources. PowerShell modules make it easier to automate repetitive tasks, manage large numbers of users and resources, and perform advanced administration tasks that are not available through the Microsoft 365 Admin Center or other graphical user interfaces.
For example, if you need to perform a bulk operation, such as setting mailbox permissions for all users in your organization, you can use PowerShell cmdlets to automate the task instead of manually modifying each user’s permissions in the Microsoft 365 Admin Center.
Every version of Windows since Windows 7 has shipped with PowerShell, but you still want to ensure you have the most recent version installed.
To check which version of PowerShell you have, run the following command:
$PSVersionTable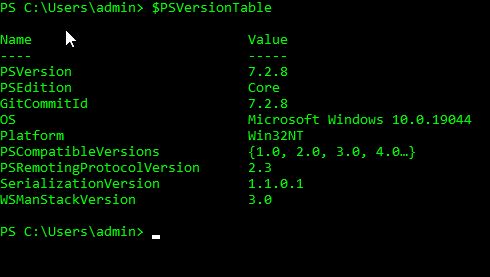
Install PowerShell 7
To install the most recent version of PowerShell, Open your web browser and go to the Microsoft PowerShell Downloads page: PowerShell 7. Select the appropriate download link for your operating system and architecture and then run the downloaded installer and follow the prompts to complete the installation process.
Install .Net Framework
You will also need to install or update the .Net Framework. You can do this by downloading and installing it here, from Microsoft.
You should now be ready to install the Microsoft 365 management modules.
Install the Azure Active Directory Module
The Azure Active Directory (Azure AD) module is necessary for managing user and group objects in Microsoft 365. To install the Azure AD module, simply run the following PowerShell command:
Install-Module AzureAD
Before connecting to Azure, you must first import the AzureAD module using the following command:
Import-Module AzureADYou can now connect using your Azure credentials using this command:
Connect-AzureAD
Install the Exchange Online Module
The Exchange Online module is necessary for managing Exchange Online features in Microsoft 365. To install and import the Exchange Online module, follow these steps:
Install-Module ExchangeOnlineManagement

Import-Module ExchangeOnlineManagement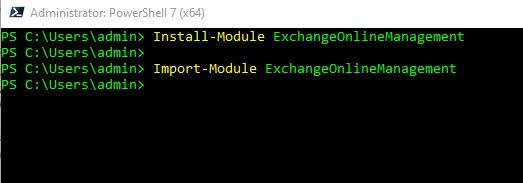
Connect to ExchangeOnline:
Connect-ExchangeOnline
Microsoft Teams PowerShell module
The Teams PowerShell module is needed to manage Teams for Business features with PowerShell.
Install the Microsoft Teams PowerShell module by running the following command:
Install-Module -Name MicrosoftTeams -Force -AllowClobber
You can then sign in with your Azure credentials by running this command:
Connect-MicrosoftTeamsInstall the SharePoint Online Module
The SharePoint Online module is necessary for managing SharePoint sites and content in Microsoft 365. To install the SharePoint Online module, follow these steps:
Install-Module Microsoft.Online.Sharepoint.Powershell
You can confirm it was installed successfully by running the following command:
Get-Module -Name Microsoft.Online.SharePoint.PowerShell -ListAvailable | Select Name,Version
To connect, you will need to know the URL of your Sharepoint organization. You can connect with this command:
Connect-SPOService -url https://*org-name*-admin.sharepoint.com
That’s it! You have now installed all the necessary PowerShell modules to manage M365 mailboxes, including the Exchange Online module. You can now start using PowerShell cmdlets to manage your mailboxes, users, and other resources in Microsoft 365.